
A well-organized grill station makes the difference between a smooth cookout and a frustrating hunt for tongs while burgers burn. Most backyard chefs accumulate spatulas, brushes, skewers, and thermometers over time, then leave them scattered on a side table or stuffed in a drawer. Proper storage keeps tools clean, accessible, and ready when the grill heats up. Whether working with a compact balcony setup or a full outdoor kitchen, the right storage solution protects equipment from weather damage and turns chaotic clutter into a functional workspace.
Table of Contents
ToggleKey Takeaways
- Proper grill tool storage prevents rust and deterioration while improving cooking efficiency by keeping every utensil accessible and organized when you need it most.
- Wall-mounted systems like pegboards, slat panels, and magnetic strips provide flexible and space-saving grill tool storage solutions that work for various outdoor setups.
- Freestanding weighted caddies and rolling carts offer portable grill tool storage options ideal for balcony grills, rental properties, or multi-location cooking.
- Budget-conscious homeowners can build DIY grill tool storage using galvanized buckets, fence pickets, PVC pipes, or tension rods for under $50 in materials.
- Clean tools before storage by wiping with a damp cloth, brushing stubborn residue with brass bristles, and applying food-grade mineral oil to prevent corrosion.
- Seasonal maintenance and winter protection—such as bringing tools indoors or covering outdoor storage with breathable tarps—extends tool lifespan through hundreds of cookouts.
Why Proper Grill Tool Storage Matters
Grill tools left exposed to the elements rust faster, accumulate dirt, and deteriorate before their time. Stainless steel spatulas develop corrosion spots when moisture sits on the surface overnight. Wooden handles crack and splinter from repeated sun exposure and rain cycles.
Beyond preservation, organized storage improves cooking efficiency. When every utensil has a designated spot, there’s no scrambling mid-cook to find the right carry out. That matters when flipping delicate fish or managing multiple temperature zones on a charcoal grill.
Safety plays a role too. Tools piled haphazardly on grill shelves can fall, creating burn hazards or tripping risks. Sharp skewers and meat forks stored loose pose puncture dangers, especially around kids and pets. A proper storage system keeps pointed implements sheathed or hung out of reach.
Finally, a clean tool station simply looks better. An outdoor cooking area functions as an extension of the home’s living space. Rusty tools scattered across a patio table send the wrong message during gatherings. Strategic storage turns a functional workspace into something guests actually want to stand around.
Types of Grill Tool Storage Solutions
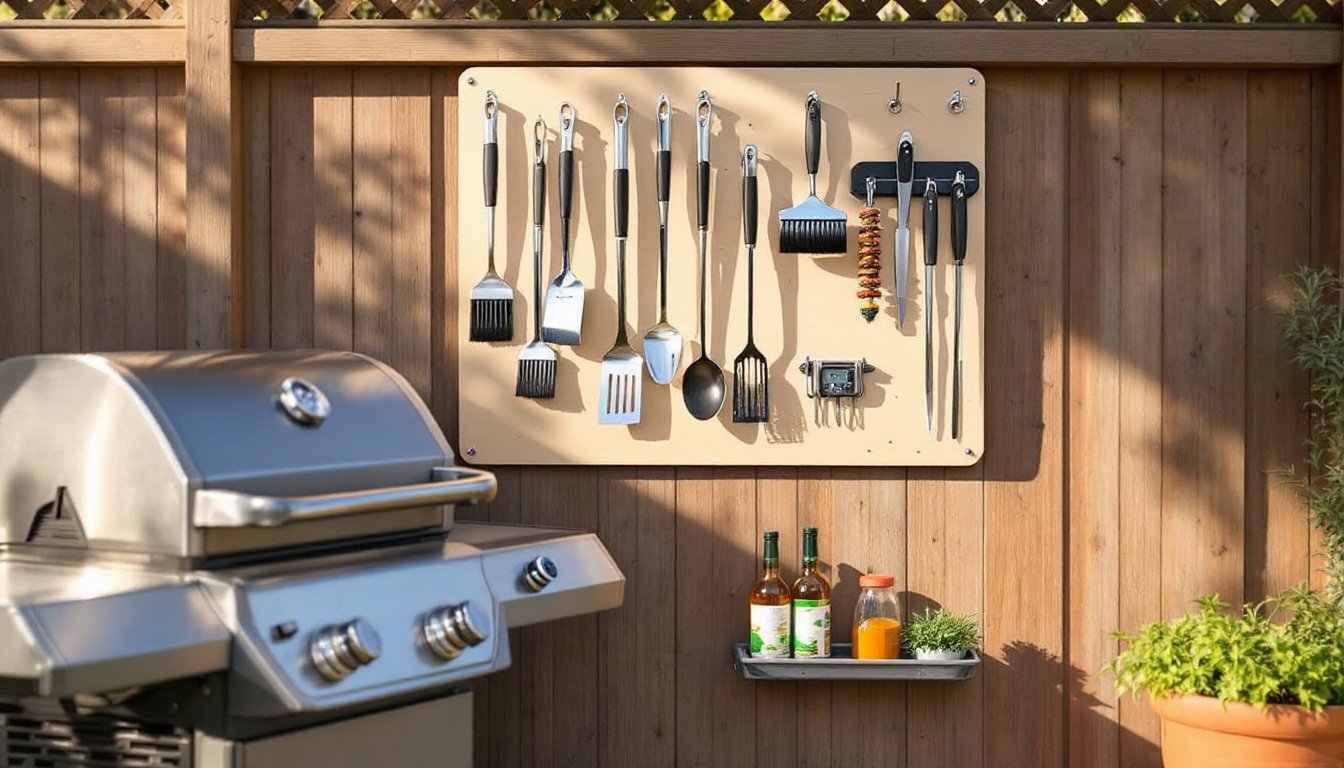
Wall-Mounted and Hanging Storage Options
Pegboard systems offer maximum flexibility for changing tool collections. Install a 24″ × 48″ tempered hardboard pegboard on an exterior wall or fence near the grill using ¼” spacers behind the panel to allow hook insertion. Hooks, shelves, and magnetic strips can be rearranged as the toolkit evolves.
For a cleaner look, slat wall panels provide similar customization with a more finished appearance. Marine-grade PVC slat wall resists moisture better than MDF-based versions in outdoor environments.
S-hooks on a wall-mounted rail create simple hanging storage for tools with loops or rings. A 36-inch stainless steel towel bar mounted horizontally at eye level works perfectly. Use ⅜-inch or ½-inch diameter S-hooks rated for at least 5 pounds each.
Magnetic knife strips aren’t just for kitchens. A 20-inch magnetic tool holder mounted near the grill keeps metal utensils organized and instantly visible. Look for strips rated to hold at least 10 pounds to handle heavier implements like grill baskets.
Freestanding Caddies and Tool Sets
Weighted base caddies sit beside the grill without installation. The best models feature a cast iron or steel base weighing 8–12 pounds to prevent tipping in wind. Compartments should accommodate both hanging tools and upright storage for bottles and brushes.
Many grilling enthusiasts prefer tool organizing ideas that double as serving stations. Rolling carts with tool hooks and shelf space provide both storage and mobility. Commercial-grade carts use locking casters and powder-coated steel frames that handle outdoor humidity.
Apron-style tool organizers worn while grilling keep frequently used items within arm’s reach. Heavy canvas or leather versions with reinforced pockets outlast synthetic materials. Look for models with at least 6 pockets sized for standard grill tools.
Pre-packaged tool sets often include a matching storage case or stand. While convenient, evaluate whether the included tools meet actual cooking needs before committing to the storage system they come with.
DIY Grill Tool Storage Ideas for Budget-Conscious Homeowners
A galvanized steel bucket filled with pea gravel creates stable upright storage for long-handled tools. Use a 10-inch diameter bucket for standard spatulas and tongs. Drill ⅜-inch drainage holes in the bottom to prevent water accumulation that leads to rust.
Repurposed cedar fence pickets make excellent wall-mounted tool holders. Cut pickets to desired length, sand smooth, and drill holes sized for tool handles. Mount to studs or fence posts using 3-inch exterior-grade screws. Apply exterior wood sealer to prevent weathering.
Many woodworking enthusiasts build custom tool racks from scrap lumber. A simple design uses a 1×6 board as a backboard with dowel rods inserted as hanging pegs. Space pegs 4–6 inches apart to prevent tool handles from crowding.
Magnetic strips salvaged from old knife blocks attach to grill side tables or cart frames using construction adhesive rated for outdoor use. Clean metal surfaces with isopropyl alcohol before bonding for maximum hold.
PVC pipe sections mounted horizontally create compartmentalized storage for smaller items. Cut 4-inch diameter Schedule 40 PVC into 8-inch lengths, seal one end with a cap, and mount to a board or wall. These weatherproof cubbies hold grill brushes, thermometers, and skewer sets.
For temporary or rental situations, a tension rod installed between patio posts holds S-hooks without permanent mounting. Choose adjustable rods rated for 20+ pounds to support the weight of multiple tools.
An old wooden toolbox converts into portable grill tool storage with minimal modification. Add dividers using ¼-inch plywood cut to height, creating sections for different utensil types. Apply marine varnish to protect against moisture.
How to Choose the Right Storage System for Your Grill Setup
Start by counting tools and sorting by type. Most active grillers own 8–15 implements: spatulas, tongs, forks, brushes, skewers, thermometers, and specialty items. Storage capacity should accommodate current inventory plus 20–30% growth for future additions.
Consider the grill’s location and available mounting surfaces. Built-in grills with adjacent counters benefit from drawer organizers or under-counter hooks. Freestanding kettle grills on open patios pair better with weighted caddies or nearby wall-mounted systems.
Weather exposure determines material selection. Covered patio storage can use powder-coated steel or treated wood. Fully exposed locations require stainless steel, marine-grade plastics, or cedar that naturally resists decay. Avoid MDF, particle board, or untreated pine in outdoor environments.
Frequency of use affects optimal storage height and accessibility. Tools used weekly should hang at waist to shoulder height. Seasonal items like rotisserie attachments can occupy higher or lower positions.
If the grill serves double duty for smoking, consider specialized storage for wood chunks, charcoal chimney, and drip pans. Many detailed guides on home workshop projects demonstrate multi-purpose storage designs that adapt to various cooking styles.
Portability matters for those who grill in different locations. Rolling carts or handled caddies work for tailgating or camping. Permanent installations suit dedicated outdoor kitchens.
Budget realistically for both materials and time. Simple DIY solutions cost $20–50 in materials but require 2–4 hours of work. Quality commercial systems range from $40–200 depending on capacity and materials. Factor in required tools: basic installations need a drill, level, and appropriately sized fasteners for the mounting surface.
Maintaining and Protecting Your Grill Tools
Clean tools before storage, not after. Crusted grease and carbon left on metal surfaces attract moisture and accelerate corrosion. Wipe stainless steel implements with a damp cloth immediately after use, then dry thoroughly.
For stubborn residue, use a brass-bristle brush rather than steel wool, which can scratch protective finishes. Soak heavily soiled tools in hot water with degreasing dish soap for 15–20 minutes before scrubbing.
Wooden handles require different care. Sand lightly with 220-grit sandpaper when they feel rough, then apply food-safe mineral oil every few months. This prevents drying and cracking from heat exposure and moisture cycles.
Inspect tools seasonally for damage. Replace items with loose rivets, bent tines, or cracked handles before they fail during use. A wobbly spatula head isn’t just annoying, it’s a safety issue when handling hot food.
Apply a thin coat of food-grade mineral oil to stainless steel tools before long-term storage (30+ days). This creates a moisture barrier that prevents oxidation. Wipe clean before next use.
Store grill brushes separately from other tools when possible. Loose wire bristles that migrate to other utensils pose ingestion hazards. Replace brushes annually or when bristles become sparse or bent.
For regions with harsh winters, consider bringing tools indoors during off-season months. If that’s not practical, cover wall-mounted storage with a breathable tarp secured with bungee cords. Avoid plastic sheeting that traps condensation.
The creative community at Instructables shares detailed maintenance routines for outdoor equipment that extend tool life by years. Regular care transforms basic implements into reliable workhorses that last through hundreds of cookouts.