
A disorganized pantry isn’t just frustrating, it wastes food, money, and counter space. Half-opened bags of flour attract pests, forgotten cans expire in the back, and every meal prep starts with a scavenger hunt. Food storage bins solve these problems by corralling ingredients, extending shelf life, and turning a chaotic pantry into a functional workspace. Whether someone’s working with a walk-in pantry or a few cramped cabinets, the right bins can transform how a kitchen operates. This guide covers everything from material selection to layout strategies, helping DIYers pick and deploy storage bins that actually work.
Table of Contents
ToggleKey Takeaways
- Food storage bins prevent pest infestations and extend shelf life by creating sealed barriers that protect dry goods like flour, rice, and sugar from air, moisture, and light exposure.
- Airtight containers with locking lids work best for frequently-used bulk items, while clear bins are ideal for packaged goods and snack visibility, maximizing both organization and inventory control.
- Proper bin selection requires measuring cabinet dimensions first, choosing materials with reinforced corners and at least 2mm wall thickness, and prioritizing hinged or locking lids over press-on designs.
- Zone-based pantry organization—grouping items by meal type such as baking supplies or breakfast ingredients—reduces decision fatigue and keeps family members engaged with maintaining the system.
- Food storage bins can increase pantry capacity by 30-40% through efficient vertical stacking and eliminating wasted space from mismatched packaging and odd-shaped containers.
- Maintenance is essential: hand-wash airtight containers every 2-3 months, inspect seals quarterly, rotate stock to use older products first, and store empty bins nested with parchment paper between them to prevent damage.
Why Food Storage Bins Are Essential for Every Home
Food storage bins aren’t luxury organizing products, they’re practical tools that address real kitchen problems. Pest prevention ranks first: bugs and rodents target torn bags and cardboard boxes. Transferring dry goods like rice, flour, and cereal into sealed bins creates a physical barrier that keeps pantry moths, weevils, and mice out. This is especially critical in older homes where gaps around cabinets provide pest entry points.
Shelf life extension comes next. Exposure to air, moisture, and light degrades most pantry staples. Airtight bins slow oxidation and keep humidity away from moisture-sensitive ingredients like brown sugar, crackers, and pasta. For flour and grains, this can double usable storage time compared to leaving them in original packaging.
Space efficiency matters in every kitchen. Bins stack uniformly, unlike mismatched bags and boxes. They maximize vertical space in cabinets and make pull-out shelves actually functional. A well-binned pantry can hold 30-40% more inventory in the same footprint by eliminating wasted air pockets and odd-shaped packaging.
Finally, bins provide visual inventory control. Clear containers let anyone see what’s running low at a glance, reducing duplicate purchases and forgotten ingredients. Labeled bins help family members find what they need without tearing apart shelves, which keeps organization intact between deep cleans.
Types of Food Storage Bins and Their Best Uses
Not all food storage bins serve the same purpose. Matching container type to content is critical for both function and longevity.
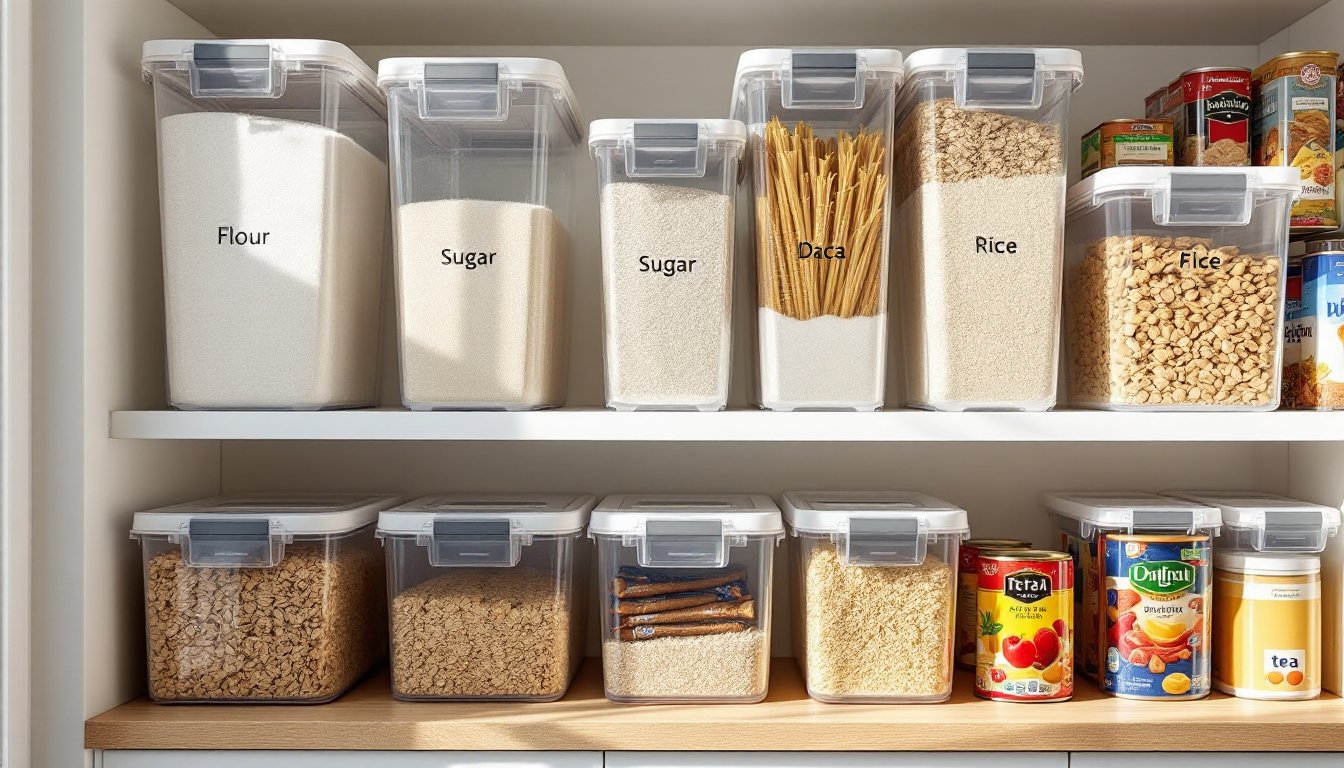
Airtight Containers for Dry Goods
Airtight bins use gasket-sealed lids, typically silicone or rubber, to create moisture and air barriers. They’re non-negotiable for flour, sugar, rice, oats, and any grain that oxidizes or clumps. Look for containers with locking mechanisms (flip clasps or screw-down lids) rather than press-on lids, which lose seal integrity after repeated use.
PET plastic (polyethylene terephthalate) offers the best balance of clarity, durability, and cost for most users. It’s BPA-free, dishwasher-safe, and doesn’t retain odors like polypropylene can. Glass containers provide superior odor resistance and can handle temperature swings if someone transfers hot ingredients, but they’re heavier and more fragile, not ideal for high shelves or homes with kids.
For bulk storage, 5-quart to 8-quart bins handle 5-pound bags of flour or sugar with headroom. Smaller 2-quart containers work for specialty items like almond flour or cocoa powder. Standardizing on one brand’s size lineup makes stacking more stable and looks cleaner.
Clear Bins for Visibility and Inventory Control
Clear bins without airtight seals excel for packaged goods that already have inner bags, snack bars, tea boxes, seasoning packets, or canned goods. They group related items and prevent small packages from disappearing into cabinet corners. The ideal food storage containers combine transparency with stackability for this exact use case.
Rectangular clear bins use space better than round ones. A 10-inch by 6-inch bin fits most standard cabinet depths (12 inches), leaving room to pull the bin forward without catching on the shelf above. Handles on either end are non-negotiable, they turn a bin into a functional drawer rather than something you have to unstack to access.
For refrigerator use, clear bins with ventilation slots keep produce from getting slimy. Solid bins work for deli meats, cheese blocks, and leftovers. Avoid tinted or frosted bins unless the goal is to hide clutter, they defeat the inventory visibility that makes bins worthwhile.
How to Choose the Right Food Storage Bins for Your Needs
Selecting bins requires measuring cabinet dimensions first, not after buying. Interior cabinet width and depth determine maximum bin footprint. Measure from the back wall to the door hinge side (not the door edge), then subtract 2 inches to account for door swing and air circulation. Height depends on shelf spacing, but leave at least 1 inch of clearance for easy bin removal.
Material choice affects long-term usability. Plastic bins under $15 often use thin walls that warp under the weight of flour or crack when dropped. Look for wall thickness of at least 2mm and reinforced corners. Glass bins cost 2-3x more but last indefinitely and don’t discolor or absorb turmeric stains. They’re worth it for items someone plans to store long-term.
Lid design separates good bins from garage-sale donations. Hinged lids stay attached, no lost caps. Pour spouts built into airtight lids allow dispensing without breaking the seal. Avoid bins where the lid sits inside the rim rather than sealing over it: they don’t stack securely and the seal fails quickly.
For deep pantries or upper cabinets, lazy susans paired with smaller bins beat large single containers. A 12-inch turntable holds four 1-quart bins of baking supplies, making everything accessible without reaching into dark corners.
Consider modular sizing within one product line. Buying multiple sizes from the same manufacturer ensures lids are interchangeable (useful when one cracks) and bins nest when empty. This matters for renters or anyone who moves frequently.
Creative Ways to Organize Your Pantry with Storage Bins
Bins only work if the system matches how the household actually cooks. Generic “pantry organization” often fails because it’s built for Instagram, not real use.
Zone-based organization groups bins by meal type or prep step. A baking zone holds flour, sugar, baking powder, and chocolate chips in identical airtight bins. A breakfast zone keeps oatmeal, cereal, and granola together in clear bins. This reduces decision fatigue when someone’s making pancakes at 6 a.m.
For families, snack stations with clear bins prevent the “there’s nothing to eat” complaint. Dedicate one shelf to grab-and-go items in see-through containers, crackers, dried fruit, nuts, granola bars. Kids can self-serve without tearing apart organized zones. This same principle works for lunch-packing supplies.
Decanting everything isn’t necessary. Reserve airtight bins for ingredients used frequently and bought in bulk. For specialty items used quarterly (like specialty flours or holiday baking supplies), keeping original packaging inside a labeled clear bin is faster and avoids mystery powder syndrome when labels fade.
Carry out vertical dividers for narrow items. Shelf dividers or tension rods create slots for baking sheets, cutting boards, or flat bins. This prevents the avalanche effect when someone pulls one item from a stack.
Many kitchen organization strategies recommend pull-out drawers for lower cabinets, but bins with handles achieve the same result for a fraction of the cost. Place bins on existing shelves and pull them forward like drawers, no carpentry required.
Label bins on both the front and lid using a label maker or paint pen. Front labels work for eye-level shelves: lid labels are visible when bins are stacked or stored high. Skip chalkboard labels unless someone actually enjoys rewriting them, printed labels last longer and stay legible.
Maintenance and Care Tips for Long-Lasting Storage Bins
Food storage bins require maintenance to stay functional and sanitary. Neglecting this turns them into another source of kitchen clutter.
Wash bins every 2-3 months even if they look clean. Flour creates fine dust films that turn rancid. Sugar residue attracts ants. Hand-wash airtight containers to preserve gasket integrity, dishwashers degrade silicone seals over time, especially on the heated dry cycle. For bins that are dishwasher-safe, place them on the top rack away from the heating element.
Inspect gaskets and seals quarterly. If a gasket feels brittle or has visible cracks, replace it or retire the container. Many manufacturers sell replacement gaskets for $3-5, which beats buying new bins. Press a paper towel against the sealed lid and flip the container upside down, if the towel gets damp, the seal is compromised.
Rotate stock when refilling bins. Pour new flour on the bottom (or into a separate bin) so older product gets used first. This matters more for whole wheat flour and nuts, which contain oils that go rancid faster than all-purpose flour.
For stubborn odors in plastic bins, wash with baking soda paste and let them air-dry in sunlight for 4-6 hours. UV light naturally breaks down odor compounds. If that fails, the plastic has absorbed oils and the bin should be relegated to non-food storage.
Store empty bins nested to save space, but place a sheet of parchment paper between them to prevent scratching. Keep lids together in a separate bin or stacked on a shelf organizer, loose lids are how bins become useless.
Check home organization best practices periodically, but don’t overhaul a working system for trends. The best pantry organization is the one someone actually maintains.